Tuesday, December 14, 2010

Many Thanks!

Sofie with butterfly face paint.
Almost a month has gone by and I haven't had time to update the blog! It has been an extremely busy as well as rewarding month!

I was at the City of Fairfax Holiday Craft Show again this year on November 20 and 21. It was wonderful to see many old friends and customers! The second day of the show was much better than the first, and I think that's because #1 daughter, Bibi, was there helping me. She is the Queen of the Tableau, rearranging my displays to best effect, and also a fantastic salesperson (to say nothing of her packing skills!).

The first weekend in December was the City of Falls Church Show. Once again, I was heartened to see many people come by because they had received my postcard. I have to thank #2 daughter, Andi, for designing a magnificent postcard once again this year. Granddaughter Sofie came by to help on Sunday, greeting all the customers and steering traffic to my booth by just being her cute, sweet self!

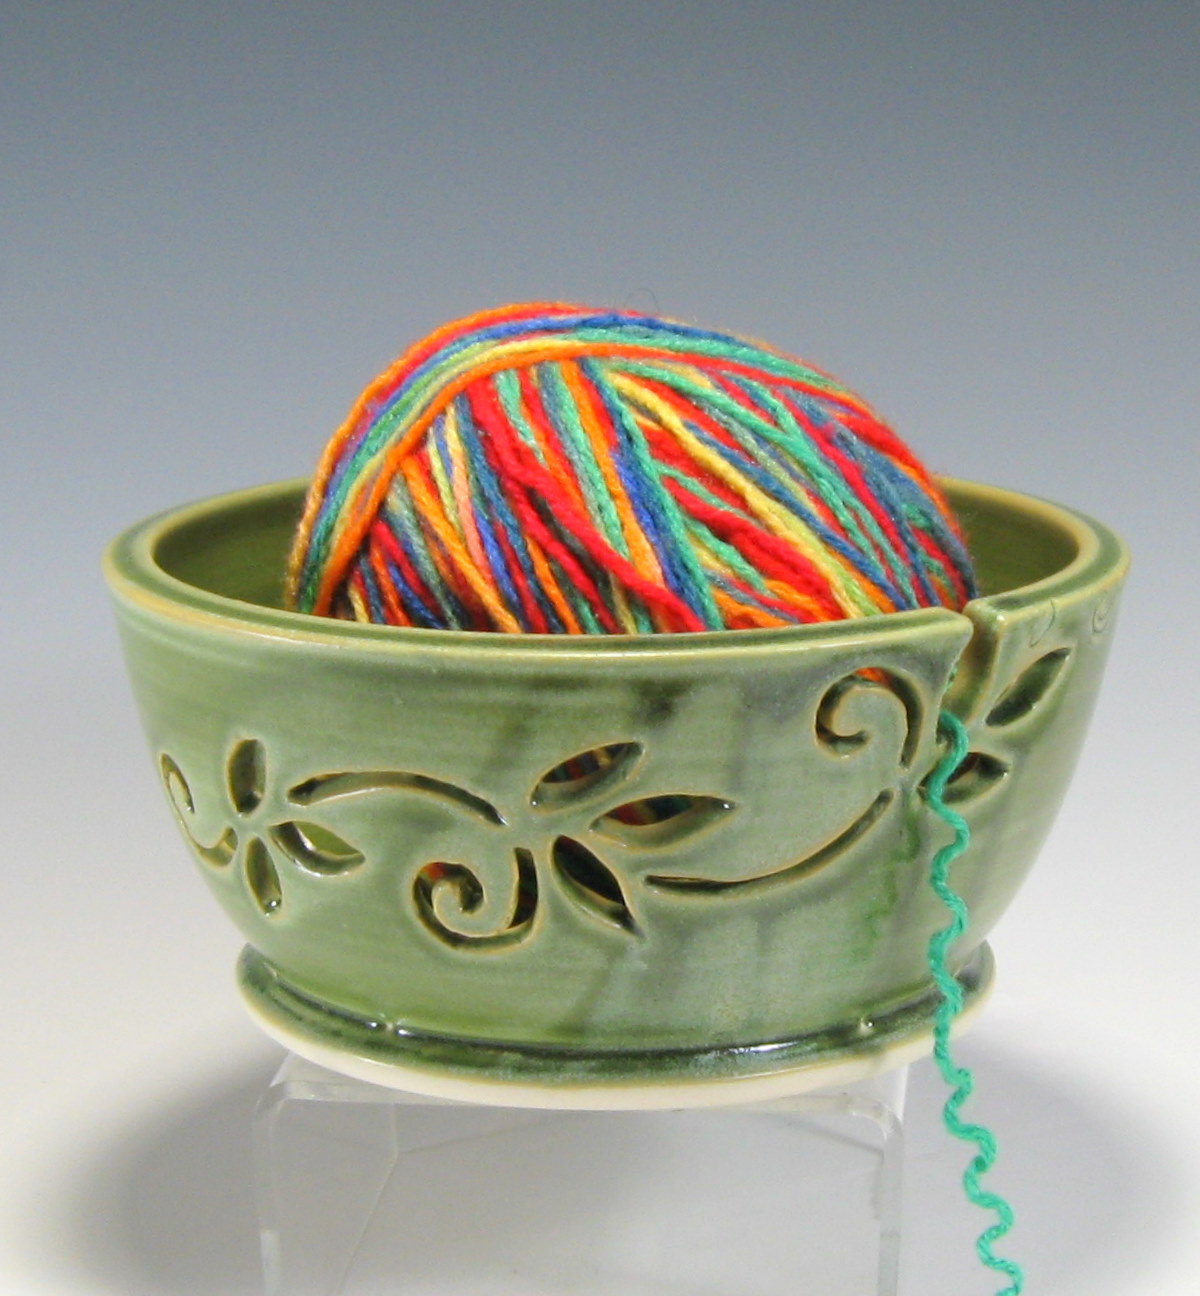
Although customers laughed saying that everyone they know has a brie baker, these were, once again, top sellers. I sold 19 brie bakers in the two shows. The yarn bowls and baskets were extremely popular, I sold 9 of those at the shows and would have sold more if I'd them. I was surprised that many people had not seen yarn bowls. But they did think that they were great gift ideas once they saw them.I did manage to make enough ornaments this year: I sold 105 ornaments between the two shows. The textured trees, both large and small, continue to be a hit!

In addition to the shows, sales on Etsy have been hopping. They picked up right after Thanksgiving and have not stopped, allowing me to reach my goal of 200 sales. This averages out to 6.5 sales a month in the past 2.5 years since I opened my Etsy store. I'm very pleased with that!

So thank you, thank you, thank you to everyone who came by my booth at the Fairfax and Falls Church shows, as well as to all my wonderful Etsy customers!

Tuesday, November 16, 2010

Leaves Falling Like Rain

It's that time of year... I am fascinated by the leaves. Just driving to the grocery store is like going into a wonderland of color. I love the leaves in the spring too... all the myriad shades of green as the light-colored shoots turn into dark green summer leaves. All of life in a small leaf: from the tiny shoot, to the nurturing leaf that helps provide energy for the plant, to the splendor at the end of the season.

I want to draw leaves, paint leaves, make clay leaves... but I've always tried to resist that urge because there is so much leaf imagery in pottery and elsewhere. Nevertheless, I've decided to take a few tentative steps. I've carved leaves on my lamps, I've drawn some leaves on a few bowls and brie bakers... I think I may look into this a bit more in the future! For now, I made a treasury that I hope you'll visit.


Tuesday, November 9, 2010

Time for a New Wedging Board

1. Canvas Wedging Board
While most studios have plaster wedging tables, I've found it much better to wedge my clay on canvas. I like canvas because it won't gouge or crack and also because it dries the clay up a bit as I'm wedging. The latter is important because, to protect my wrists, I throw with very soft clay.


2. Stapling the canvas to the board
In addition, a canvas wedging area can be set up quickly and easily and lasts a long time. I made mine in 1999 when I built my studio. Eleven years later, the canvas was getting a bit threadbare so I decided to redo it today. With my husband's help, it took all of 30 minutes! Here's the quick and easy way to make a long-lasting wedging board.

3. Cutting off excess canvas
I started with a piece of wood about an inch thick. The dimensions of the piece of wood are only restricted by the area available to you for the wedging board. Mine is about 2.5 x 2 feet. Simply staple marine canvas to the board making sure that you pull it very tightly (fig. 2). I put canvas on both sides of the board and use one side for dark clay and the other for white clay. After stapling the canvas and cutting off the excess (fig. 3) I cover the edges with duct tape (see fig. 1).

I attach the wedging board to a a sturdy table with vise grips. I've placed bricks under the table's front legs. This puts the table at a slight angle away from me, which makes the wedging motion easier (see fig. 1).
4. Ware boards made out of wallboard

I also use pieces of wallboard as ware boards. Simply cut a piece into as many different sizes as you need and duct tape the edges so they won't crumble (fig. 4). You can also use one side for dark clay and other for white clay.

Friday, November 5, 2010

Yarn Baskets and Bowls Part 2

I'm very happy with the way the yarn bowls and baskets turned out. You can find them for sale in my Etsy store.


Thursday, October 28, 2010

Yarn Bowls...


Everyone seems to love yarn bowls!

I make mine in two varieties: bowls and baskets. Both the bowls and the baskets have a relatively wide foot and thick bottom to make sure that they are very stable. The baskets evolved at the suggestion of some of the grandmas in Etsy's WWWG Team. The carved handle makes them easy to carry from room to room and provides a place to put the needles.

I like to the look of carved pieces and I enjoy carving through leather-hard clay, so I generally carve a more intricate design on the bowls and baskets than what is strictly necessary to serve the function of a yarn bowl.  I think that this design element opens the bowls and baskets up to many more uses, making them an item of decoration for the home if used, for example, with pebbles or sea glass on the bottom to hold a candle. They can also be used as candy dishes or to hold jewelry or keys.

Tuesday, October 12, 2010

Love and Sweetness

This past weekend was my brother's wedding. The ceremony was held at Overlook Farms in Clarksville, Missouri, overlooking the Mississippi River. The site--with its view of Old Man River, hills, pecan and walnut trees--was a romantic's dreamscape. The ceremony included readings of several poems, including e.e. cumming's I Carry Your Heart. But the most inspiring poem (which elicited a loud laugh from my 8-year old grandson) was Li-Young Lee's From Blossoms.

From blossoms comes
this brown paper bag of peaches
we bought from the boy
at the bend in the road where we turned toward
signs painted Peaches.

From laden boughs, from hands,
from sweet fellowship in the bins,
comes nectar at the roadside, succulent
peaches we devour, dusty skin and all,
comes the familiar dust of summer, dust we eat.

O, to take what we love inside,
to carry within us an orchard, to eat
not only the skin, but the shade,
not only the sugar, but the days, to hold
the fruit in our hands, adore it, then bite into
the round jubilance of peach.

There are days we live
as if death were nowhere
in the background; from joy
to joy, to joy, from wing to wing,
from blossom to blossom to
impossible blossom, to sweet impossible blossom.

My contribution to this lovely day was a "wishing pot." It was a humble pot that was filled with everyone's best wishes for my brother and his bride. What a wonderful idea!

Thursday, September 23, 2010

Support Your Local Artisan

In mid-August, The Washington Post ran an article about decorating for the fall that highlighted "artisan wares" and the fact that "major retailers are offering alternatives" to handmade artisan products found on Etsy. This really bothered me because, in addition to mentioning alternatives to Etsy sellers, the article showcased clay vases from Indonesia selling from $12 to $24. Well, I wrote a letter to the Post's editor, which got printed on September 2. Here's a link to my letter.

As I talked about this with several artisans, someone commented that in these difficult times you can't blame people for going for lower priced items. I think that it's up to us to educate our customers about our work and why they should purchase local artisan wares, even if they have to pay a bit more. Lisa LaPella has pointed out that she would rather save her money to purchase a more expensive handmade item that can become a treasured heirloom. But I think that one of my repeat customers put it best when she sent her own feedback in response to my letter to the editor . She said:

"I'm not an artist but I support local artists by buying at local sales and on Etsy. The benefits of buying locally applies to art, not just vegetables purchased at local Farmer's Markets.  Buying locally produced products cuts down on energy consumption, because there's less transportation; it provides income to a local resident,  it supports locally purchased materials, and it supports the local arts community overall."

Thursday, August 5, 2010

Where Did That Idea Come From?

It's not easy to come up with original ideas in a medium as ancient and everyday as pottery. Most often, new ideas carry with them echoes of all the other pots we've seen and admired. It reminds me of the sci-fi writer who refused to read other writers' work in order to avoid being influenced by their ideas. I've found that potters are probably the only artists who generously share their techniques, ideas, glazes, and so on.

I learned to make carved luminaries very early in my pottery journey and for a long time I made open and closed carved forms to be used with candles. A few years ago, my mentor, Virginia potter and teacher Jane Cullum showed me how to adapt the luminaries to accommodate a snap-in socket. One of my first sales in Etsy was one of those lamps! Later, I was putting my grandson to bed one night and had just turned off the lights when I saw the glow-in-the-dark planets and moons and stars that his Dad had pasted on the ceiling of his room. That's where the idea of making a lamp with a moon and stars came from. But how about having it project on the ceiling?

I had been making lots of items using closed forms, including boxes, so it was easy to adapt a closed form into a starry nights lamp with a snap-in socket. I've now started making them with other designs as well. Here's one of my favorite lamp forms, which takes two snap-in sockets and light bulbs.

Wednesday, August 4, 2010

Making Lamps 2


Here's part 2 of "Making Starry Nights Lamps."

After you've made the round form, trimmed it, made the hole for the snap-in socket, and put feet on it, it's time to carve the design.

I use templates, stencils, hole punchers, and cookie cutters, but you can also use your own design or cut out a free-hand design. Two things are important at this stage: (1) how wet your pot is and (2) the type of design.

I talked yesterday about (1). This is really important. If you start carving when the clay is too wet you can expect 3 types of problems: clumping of the crumbs, a deformed pot and trouble removing the carved out pieces because the clay will tend to stick together even after you've cut it. Ideally, your clay should be a good leather hard.

I start by sketching the design onto the form. You could start carving from the beginning, but I like to sketch in the design first so that I can better visualize it finished. At this point I am taking care not to leave too little space between cut-outs because those narrow pieces of clay are the most likely to crack, deform or break off. Spirals and curlicues are particularly prone to these problems. However, it doesn't mean that I won't use such a design, just that I might not carve some sections all the way through. I also think about the size of the cut-outs and how it will look with a light bulb in it. I try to have a combination of large and small cut outs so that the light won't glare out of the lamp or the light bulb is too visible.

Once I'm happy with the design, I start carving with a scalpel, x-acto knife or other such sharp knife. I generally stick one finger through the socket hole and stab the scalpel down to my finger and use it as a guide while cutting. This minimizes cut "overruns" (but really hurts!). Pay attention to what the clay is doing, sometimes it's fine to slide the scalpel all the way around a design, other times it's best to move in an up-and-down motion all the way around the design. I find that this usually depends on how wet/dry the clay is and how intricate the design is. So, I'm likely to go carefully up and down around a spiral (because they break off so easily!), and just slide around the edges of a leaf.

Don't fuss with the crumbs and with refining the cut out areas. Once the piece is bone dry the crumbs can easily be removed by running a needle tool all around the cut-outs. Then shake the piece to get all the crumbs to fall out of the socket hole. I also sand the pieces when they are bone dry.

You can make these lamps as open cylinders as well and I'm experimenting now with covered oval, triangle, and square shapes... we'll see how those come out.

Have fun!

Tuesday, August 3, 2010

Making Lamps 1

The Starry Nights Lamps have been my best sellers. I recently sold my last 3 in one week and had to put aside other projects to make some more lamps. So I thought I'd show you how I make
them.

I start out with about 1.5 lbs of clay and throw a closed form. Before taking it off the wheel, I use a metal rib to smooth the surface and an edger to remove some of the excess clay at the bottom. I run the wire under them but don't take them off the bat until they can be handled without distorting. At this point, it's a good idea to poke a small hole somewhere with a needle tool.


Once it is dry enough to trim, I refine the form and make a hole in the bottom for the snap-in socket. I have a small cookie cutter that is the right size and I've marked it "Lamp Socket" so I know which one to use every time. The hole is about an inch in diameter.


Unless you are going to trim and then move immediately to cutting out the design, it's best to trim the forms a bit wetter than usual. The reason is that it takes a while to cut out the design (the starry nights lamps take the best part of an hour) and the pot is drying as you're doing this (more or less rapidly depending on ambient humidity). You don't want the pot to be too wet when cutting because the clay crumbs will clump and also the form can collapse. But you don't want to do it too dry because you run the risk of cracking. So, ideally, you should be cutting the design at the pliable leather hard stage.

The next step is to add the feet. Feet are necessary because you need a space for the cord. The height of the feet is a matter of your own aesthetics. Sometimes I throw a ring and add it to the bottom, cutting out a notch for the cord. Other times I add small lumps.

Tomorrow: Cutting out the design!


Saturday, July 24, 2010

Sharing Ideas

I would never suggest to a painter that she paint her work in a different way or use different colors, or to a photographer that he choose a different subject matter or angle. However, it often happens that people suggest to potters different ways of making their wares or how, with only a few tweaks it could be repurposed. I don't have a problem with this. I think that the reason people feel more comfortable making these suggestions is that we make functional items that are more personal. After all, there's a difference between hanging a picture on the wall and the intimate action of bringing a cup to one's lips and drinking from it. Also, people bring their own life styles and experiences to bear on how they might use it. I made my Mom a vase, but she uses it to hold kitchen utensils. She loves it because the colors match her kitchen perfectly (totally unintentional on my part!) and she gets to have it out all the time, not just when she has flowers to put in it.

So, I made this business card holder a while back...

One of my regular customers saw it in my Etsy store and suggested that I make a casserole with impressed sided. What a brilliant idea! So here are some casseroles following Ronnie's great suggestion. To make them I first throw a bottomless form and push it into an oval shape. Once the clay is dry enough to handle, I attach a bottom to the form. The bottoms can either be made from a slab or thrown. Then I use clay stamps to impress a design and attach handles and feet. After they are finished, the pieces are carefully wrapped in plastic and left to dry slowly. Once bone dry they are fired once to make them easier to handle. They are then glazed and fired a second time.


Wednesday, July 21, 2010

Kiln Opening!

I did a glaze firing last night with a couple of new glazes: the bright blue and the emerald green. You've already seen the emerald green, but I've mixed a large batch of it now and I'm having consistently great results. I think it's my new favorite: it looks great in the teapot and the casserole dish!

I had done a small test with the blue and originally thought that it was too blue, but I think I'm liking it more now that I mixed a large batch of it. It's a shiny, deep, deep blue that I think is going to go over well.

I have a feeling that these two new glazes are going to end up replacing the blue and green Pharsalia glazes, which are a bit more tricky. For example, the Pharsalia blue on the rim of the casserole sometimes comes out with brown splotches or speckles. These can be very nice, but other times... not so much. In this case, the brown is concentrated on the casserole's feet so that it looks two-tone...

Another experiment in this batch is the two small boxes in the bottom shelf: one blue and the other green. This is not a "new" idea, but a return to an old one. I use an oxide wash to stain the bisque making sure that the texture is highlighted, and then I dip the piece in a clear glaze. Here, I used cobalt carb for the blue box and copper carb for the green one. The pieces are white on the inside.

I painted some leaves on the soup bowls. I'm still having a bit of trouble with the green color burning out, but there's a bit more green in these than in past experiments. I think I'll just have to paint it on thicker.

And finally, my brother is getting married in a couple of months and I was thinking of making a set of dishes. I can't decide exactly how to glaze them and did this trial run using the Randy's Red and Pharsalia Green glazes. I'm liking that combination a lot!

Monday, July 19, 2010

Summer Clearance Sale!

I am in the process of marking down items in my shop for my Annual Summer Clearance Sale. This will take a bit because I have to open each item listing and edit 3 different pages. Unfortunately, as far as I know, we don't yet have a tool that will allow us to apply percentage discounts to each item without having to go through the editing process. But, that's okay... It gives me an opportunity to tweak a few other things in the listings anyway.

So please keep checking my Etsy store because, like the items shown here, everything will be marked down!


If you are local, keep an eye out for information about the Kiln Club's Clearance Sale, which will take place on August 7th at Bethesda Elementary School from 9am to 2pm.

Saturday, July 17, 2010

Wedding Favors

When one of my daughters got married 4 years ago, she asked me to make tiny vases w/ a heart to hold the table assignment cards. I made them all different sizes and glazes, and guests even traded them! These are the vases:

I also made some personalized hearts to be used for gift bags at her shower:


But that was it. I never really got into the "wedding market"... until now!

I met a delightful bride-to-be and her fiance who asked me to make 100 olive dishes. They plan to give them out as favors. Apparently, there is a family story connected to olives! This is the olive dish they want:

I am delighted by this order! First, because weddings are a time of such high hopes when it seems that the future is wide open. Second, because I love olives! Third, because making these little dishes is a lot of fun!

So, there it is. I have until next April to get them done and I started this week.

Here are some dishes waiting for handles:


And some handles waiting for dishes:

And the first batch of 8 dishes drying: